ZX Spectrum Diagnostic board
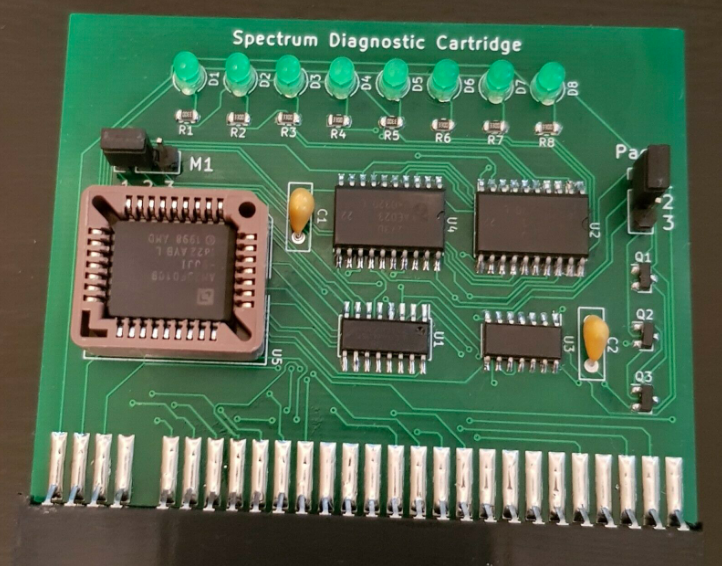
The Diagnostic board is built using the original design by Dylan Smith and can be updated/flashed using Dylan/Brendon flashing tool which is included on the ROM.
The diagnostic board allows functional testing of ZX Spectrum hardware and related clones. (48k, 128k +2). Comes loaded with 3 diagnostic ROM’s (Dylan Smith’s original 48k & 128k ROM v0.1, and Brendan Alford’s ROM v0.38)
(Does not work on the +2A/2B/3 models)
LED output on the diagnostic board will assist in locating faulty RAM chips on the Spectrum.
The Diagnostic board has been configured as follows:
- Page 0 – Dylan’s diagnostic 48k ROM v0.1
- Page 4 – Flash utility
- Page 5 – Brendon’s diagnostic ROM v0.38
- Page 6 – Dylan’s diagnostic 48k ROM v0.1
- Page 7 – Dylan’s diagnostic 128k ROM v0.1
When page jumper 1-2 is selected the board will boot from page 0
Warning: Always power off the computer when you plug/unplug the cartridge. If you don’t you risk damaging the computer and cartridge. Retro computers are not hot swapable.
To change the boot ROM:
- Set page jumper to 2-3
- Plug in cartridge
- Power on Spectrum
- Enter command: CLEAR 32767
- Enter command: OUT 31,36
- The flash utility will now load
- Press enter for other options
- Press x for erase
- Select 0 (Erase page 0)
- When Done, press any key to exit
- Press enter for other options
- Press c for copy
- Select 5 for Brendan’s ROM, or 6 for Dylan’s 48k ROM or 7 for Dylan’s 128k ROM
- When Done, press any key to exit
- Press enter for other options
- Press p for program
- Press 0 (ROM is written to page 0)
- When Done, press any key to exit
- Power off Spectrum.
- Change page jumper to 1-2
- Power on Spectrum and ROM tests will begin.
For further information see Brendan Alford’s github page.


